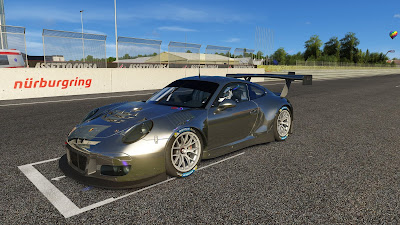
For the beginning we have to check first, that the car we want to paint and effect it is supporting the "ksPerPixelMultiMap_damage_dirt"ShaderX.
For that we will do like in the first tutorial and use the 3DSimedit or look at a list below (WIP).
So lets start with a new skin for a vehicle. Here we gonna use a Porsche 911 GT3 R 2016.
This is a standard car (in case of Kunos-content) and support the ShaderX noticed with 3DSimedit.
We start with creating the extension-folder and a skin-folder default. We use default in this example, you can name the new folder like you want, but be aware to name the folder right in the ini-file.
This is what the car will look so far ingame due to no texture-file has been added yet.
This will change soon.
In the ext_config.ini we will write (or add if file is already in place)
[INCLUDE]
INCLUDE=common/materials_carpaint.ini
[DEFAULTS]
CarPaintMaterial = EXT_Carpaint
[Material_CarPaint]
ClearCoatThickness = 0.50
[Material_CarPaint_Metal]
Skins = default
You already can try every effect now, but this is not what we wanna do now. I chose the metal effect and the car looks like this:
If you add now the skin texture you have to be careful. Create the main-picture in the texture just like you want and set the alpha-layer to a complete white one. This is necessary to become the effect to a few parts on the main-texture.
Now we have to create the MAP-file for this skin. In the main-picture of the MAP-file every spot that has to have the effect, paint them white. Spots in the file which are not suposed to have the effect, paint them black. The alpha-layer is not needed for this one here, so you can delete it.
No we take a look first to the car with main-texture incl. a complete white alpha-layer:
With the right programm like photoshop or what every you prefer, create the MAP-file as described. This will need some time, because you have to be sure, which parts has to have effect (white spots) and which not (black spots).
The result ingame will look like that now:
This MAP-file will do the seperation for all effect, but not for Chameleon and Rainbow.
If you need some help, contact me:
Facebook (fb.com)
Email : lucianpaine@googlemail.com


Vania Printing Jakarta melayani jasa fotocopy murah dan jasa percetakan murah. Tersedia layanan cetak spanduk, cetak banner, cetak buku yasin, print warna, ATK dsb.
AntwortenLöschen